
I love reading the newspaper. There’s something satisfying about paging through the inky newsprint, sipping on a cup of hot cocoa, catching up on the latest national news, soaking up the details in the local stories, and comparing the weather forecast to reality. I always save the best for last: the comics (Calvin and Hobbes, I miss you!). The same section has the Sudoku puzzle…I love solving those. There’s a certain comforting feeling about tangible print media that cannot be recreated by online news sources.
My absolute favorite section is, of course, the food and cooking section (too bad it only comes once a week!). I love reading about local restaurants, getting ideas for recipes, and looking through the grocery advertisements. I’ve always been a recipe clipper – you’ll never know when you find a recipe that’s a keeper!
This recipe is one of those clipped-out-of-a-newspaper keepers. It was printed when I was ten years old (there are expired coupons for Chex cereal on the back of it!). My mom had this recipe clipping taped to the inside back cover of one of our favorite cookie cookbooks.
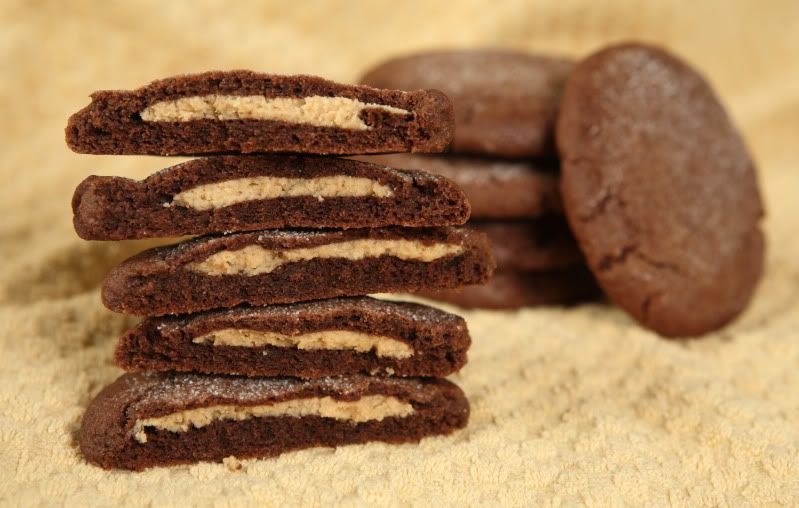
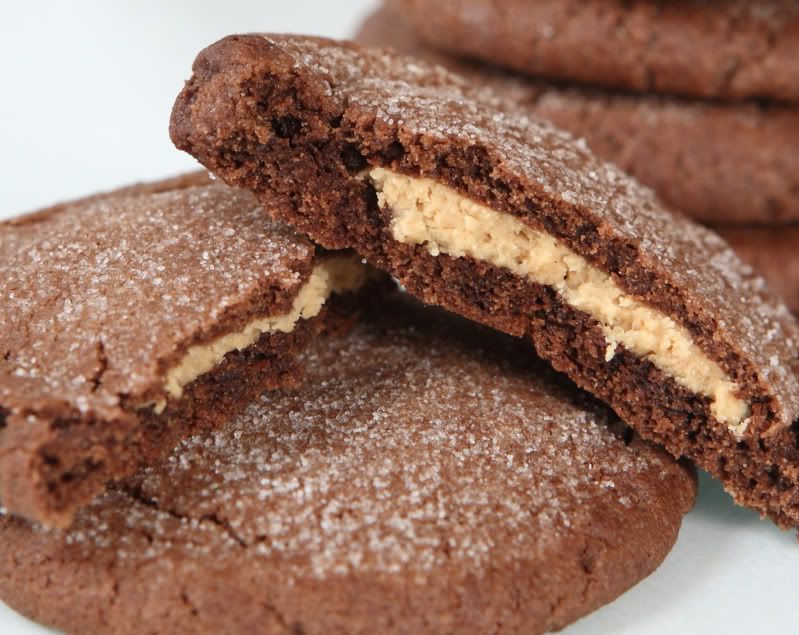
I remember wanting to make the cookies often as a child, partially because I have always loved the combination of chocolate and peanut butter, and partially because the cookies in the accompanying picture had these cute little green and white Christmas trees piped on them – they looked fun to eat. The name they gave the cookies was “Magic Peanut Butter Middles,” a name I always thought fell short (the “Magic” part seemed cool to a ten-year-old, but “Middles”?? Really?? Ok, I guess the name I came up with isn't much better...) Despite the writers’ (and my) halfhearted attempt at a creative title, the cookies were always a hit with me and my sister. Biting into what looks like just a plain old chocolate cookie and finding a delicious, creamy peanut butter filling is fun when you’re ten! (It’s still fun now!)
The recipe is very hands-on, so it’s a little messy, but the method is easy enough that my sister and I made them together when we were young. You might enjoy making these with your kids.
Be sure you use “kid's” peanut butter, not the all-natural kind that you have to stir up before using. (The Jif/Skippy/Peter Pan/whatever kinds contain solid fats, and the cookie recipe presumably was written and tested with that fat composition in mind because it specifically recommends Skippy brand original creamy peanut butter.) Or, try the natural kind and report back on how it turns out…I have never tried using natural peanut butter in this particular recipe, but I have tried Jif brand original creamy peanut butter, and I can say that it works well.
Chocolate Peanut Butter Cookies
Makes 18 cookies
First, start the cookie dough:
Cookie Dough Ingredients
1-1/2 cups all-purpose flour
1/2 cup unsweetened cocoa
1/2 tsp baking soda
1/2 cup sugar
1/2 cup packed brown sugar
1/2 cup butter
1/4 cup “kid's” peanut butter (not the “natural” kind)
1 tsp vanilla
1 egg
Preheat your oven to 375 degrees F.
In a small bowl, whisk together the flour, cocoa, and baking soda - blend it well. Set it aside.
In a large bowl (I use my stand mixer, but always did this with a wooden spoon when I was a kid), beat together the sugar, brown sugar, butter, and 1/4 cup peanut butter until it is light and fluffy and well-combined. Add the vanilla and egg; beat well.
While the stand mixer is combining the above ingredients, I start mixing together the filling:
Filling Ingredients
1/2 cup “kid's” peanut butter (not the “natural” kind)
1/2 cup powdered sugar
In a medium bowl, combine the 1/2 cup peanut butter and the powdered sugar. It starts out with a rough texture…

…but will come together if you just keep stirring.

Roll the filling into 18 one-inch balls. (Yes, there’s more than 18 here…I made a bigger batch.) Set them aside.

(When I was a kid, I just used my hands, but now that I have better kitchen tools, I use a mini ice cream scoop like this one…

…so much easier! Less mess! It’s exactly one inch in diameter, so it’s the perfect size.)
Back to finishing the cookie dough:
Stir the cocoa mixture into the large bowl containing the creamed butter/sugar mixture until the ingredients are all blended together.
Now start shaping the cookies:
Take a heaping tablespoon-or-so of dough (about the size of a ping pong ball)…

…and use your fingertips to sort of flatten it into a little cupped circle of dough. Put one of the peanut butter balls in the center…

Shape the chocolate dough around the peanut butter to entirely encase it. Roll it around in your hands to make a smooth ball. Place the shaped dough about 2 inches apart on a cookie sheet (the original recipe calls for an ungreased sheet, but I always use parchment paper on my sheets for easier cleanup).

Use the bottom of a drinking glass dipped in granulated sugar to flatten the cookie balls to approximately 1/4-inch thick. (Don’t be too skimpy with the sugar or it’ll all disappear into the cookies as they’re baking.)

Bake at 375 degrees F for 7 to 9 minutes, or until the cookies are barely set and slightly cracked. They should still be soft – do not overbake them or they will be dry.

Leave the baked cookies on the warm cookie sheet for only a few minutes, just until they are firm enough to transfer to wire racks for cooling.
These cookies are soft inside, but have a nice exterior texture due to the sugar on top. With all the peanut butter in these cookies, you’ll definitely need to enjoy these with a tall glass of cold milk! Yum!
OMG - they look amazing!! :) Will definately be trying these out!! :)
ReplyDeleteI came across your blog from the daring bakers site. Since seeing these cookies I have not been able to get them out of my head. It's been about a week now but I think I am finally going to break down and bake them. Thanks for the posting!
ReplyDeleteHope you enjoy them! Be sure you don't overbake them or they will be dry! Now I'm in the mood to go home and make them tonight again, even though I just made them recently. Yum! :-)
ReplyDeleteOkay, I made them tonight. One question, how do you get the perfectly round edges when flattening them down? Mine made a star or jagged edge type pattern (which looked kind of cool) but unless I worked really hard I couldn't get them round.
ReplyDeleteThe other thing is, I think I used peanut butter that was too old. We usually use Adam's natural for everything so I had some Skippy in the cupboard that has been in there for at least three years, maybe more. Yah, I know, kind of gross. Anyway, it tastes like the peanut butter and oil separated. I'm still going to post the baking experience on my blog, even though this batch didn't taste great, because I think it is a yummy recipe, just not this batch with the old peanut butter. If you don't mind I'm going to link to your recipe post so I can give you credit for the original recipe.
Glad you had a chance to try them, and I agree, with newer peanut butter, you'd probably have better results in the flavor department. They are really yummy cookies, especially when served slightly warm with a tall glass of cold milk.
ReplyDeleteYour comment about the jagged edges really got me thinking. Occasionally I have ended up with less-circular cookies...but usually they are mostly circular with few chunky cracks here or there. I'm not sure exactly why there would be a difference, but here are some ideas:
At first I was thinking there may have been a difference in how thick or thin the cookies were pressed. But from the pictures that you posted on your blog, your cookies look pretty similar in thickness to mine…and certainly no thinner (or thicker) than any other random batch I’ve baked over the years. Yours might be slightly thinner than the cookies in my picture, but they are really pretty close. I guess it is possible that the extra pressure to flatten them a teensy bit thinner could make a difference...?
I’m guessing it might have more to do with the fat content of your peanut butter. If some of the fat had separated out and therefore wasn't scooped into your measuring cup, the resulting chocolate dough wouldn’t have the same fat content as it would have had with evenly-machine-blended peanut butter. Dough with less fat won't be as soft as it would be if it had more fat.
Another variable might have to do with your flour. When I measure flour, I usually use one scoop to get the flour out of the bucket…then I gently shake that scoop over my measuring cup. I level it off with a knife. I don’t scoop the flour with my measuring cup because it can overpack the flour into the bottom of the cup. Maybe your dough is drier than mine because it has a bit more flour due to a different measuring technique? I can weigh out a measured-by-my-method cup of flour for you, if you’d like. (Measuring flour by weight is the most consistent method!)
I am not too knowledgeable in scientific stuff, but there is a LOT of chemistry involved when baking...and it seems that the biggest variable between our two batches was the peanut butter…and possibly the flour measurement, but I’m not sure how you’re measuring, so I can’t say for sure.
Hopefully they work out better for you on the second try. They are really yummy! And of course you may link back to my post!
i love the idea of putting the peanut butter in the middle - i have never seen this before.
ReplyDelete