
My sister recently had a birthday, so we spent last weekend celebrating. I was lucky enough to be invited to join her and her friends at a tapas-style fusion restaurant, Mosaic. One word: yum. Our group tried nearly everything on the hot tapas menu, plus a few items from the cold tapas menu. Just about everything was outstanding. (If you’re in St. Louis and enjoy tapas-style food, give them a try. Go for the quail, potato gnocchi, tuna tartare, scallops, or the mussles…those were my favorites.)
For dessert, her boyfriend surprised her with a plate of beautiful cupcakes from The Cupcakery. Their cupcakes are simply delicious – tender cake with perfectly-sweetened frosting. (“Yum” works here too!) We had a great time celebrating together - thanks for inviting me along, sis!
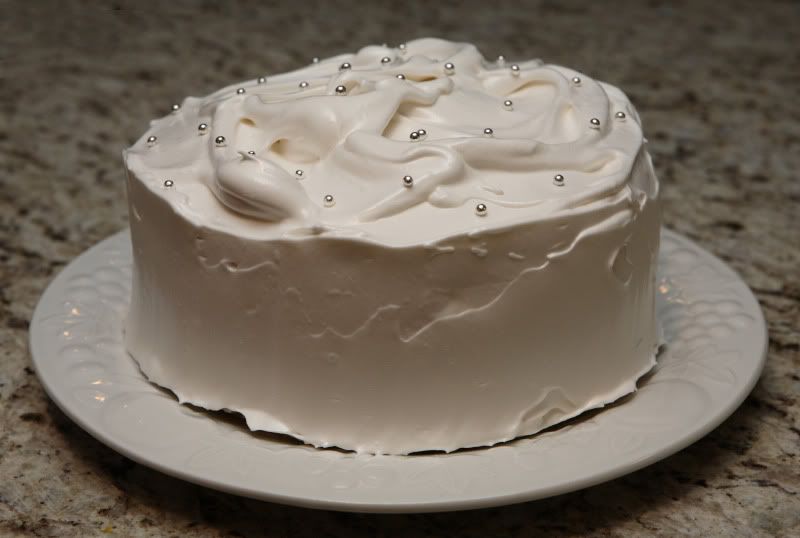
The next evening we had a birthday celebration with just our family. I knew I wanted to make my sister a white cake since that’s her favorite flavor, but the cupcakes from the previous night were also white cake, and I didn’t want to have Round Two of exactly the same basic flavors. So, to mix things up a bit, I decided I’d layer the cake with raspberry filling and frost the outside with a totally different kind of frosting than what was on the cupcakes – I used a billowy marshmallow-flavored frosting.
Only problem was, I’ve never made a raspberry filling for a cake. (Well, I have used raspberry jam in certain applications before, but I needed something that would hold up to the weight of a three-layer cake.) I found a recipe for blackberry mousse filling on a cooking forum online, and it looked like several people tried it and thought it was decent enough, and people even indicated they had made it with raspberries instead of blackberries, and I was kind of short on time, so I gave it a shot. It was pretty good, but not exactly what I was looking for. Actually, it was almost too dense – at least, it was too dense when paired with the light-textured billowy frosting I used on the rest of the cake. That said, I think it’d be great when paired with a regular American-style buttercream or any other densely-textured frosting. It did make for a pretty presentation, though, and it was not too bad, so I’ll include it here. And more likely than not I’ll make it again, but next time I will probably omit the whipped egg white – that should make the texture less dense.
The cake and frosting I used came from one of my favorite cookbooks – one you’ve seen on this blog before – Diner Desserts, by Tish Boyle. I keep turning to this cookbook for great made-from-scratch desserts. I’m not sure how much I paid for the cookbook, but it was worth every penny. I haven’t changed the recipe much – it is really good exactly as it is. Some of the text I rewrote here to make it easier to understand (I hope!). And I added the raspberry filling.
As I was debating on how to transport the cake (its at least a 40-minute drive, even with decent traffic), I decided I’d bring the cake unassembled to my sister’s house. I finished the last steps of the filling and frosting there. I was afraid the cake would slide apart and be ruined if I tried to bring it already assembled (the frosting is really very light textured, and I was not sure exactly how the raspberry filling would hold up since I had never made it before). So I left the cooled cakes on their wire racks, covered each loosely with freezer paper (it has a coating of some kind of plasticy material that helps keep food from sticking), and stacked it all up in a cardboard tray left over from a case of bottled water. It worked out pretty well. The cakes did not stick to the freezer paper and everything arrived intact.
Triple Layer White Cake
Makes one three-layer cake 8 inches in diameter
2 cups cake flour
1 Tbsp baking powder
1/2 cup unsalted butter
1-1/2 cups granulated sugar
1 tsp finely grated lemon zest
1-1/2 tsp vanilla extract
1 tsp salt
9 large egg whites, at room temperature
1 cup whole milk
To make the white cake, position two baking racks near the center of the oven and preheat to 350 degrees F. Grease the bottom and sides of three 8-inch round cake pans. Cut out three rounds of parchment paper slightly smaller than the internal diameter of the bottom of the pans (test then to be sure they fit).

Grease the empty cake pans, then place a round of parchment paper in the bottom of the pan. Grease the paper. Dust the sides of the pan with flour and tap out the excess. (I’ll admit, I forgot this step…it all still worked out in the end, but it would have been easier to get the cake to come out of the pan if I had remembered…)
In a medium bowl, sift together the cake flour and baking powder. Stir them together with a whisk. Set them aside.
In an electric mixer, using the paddle attachment, in a large clean bowl, beat the butter on medium-high speed until smooth, about one minute. On medium speed, gradually beat in 1 1/4 cups of the granulated sugar. Increase the speed to high and beat until well combined, about two minutes. Add the lemon zest, vanilla, salt, and three of the egg whites. Scarpe down the sides of the bowl with a rubber spatula and beat the mixture on medium high speed until light and fluffy, about two minutes. Add the sifted dry ingredients in three additions alternately with the milk in three additions. (Three? Ok, at least split it into two (there’s hardly enough volume to easily split it into thirds), and I believe the best results are obtained if you work it out so an addition of dry ingredients goes in the bowl last. Not sure if there’s any logical reason as to why that’s better, but that’s how I’ve always done it.) Scrape down the bowl and beat until smooth, about 1 minute.
You’ll need to beat egg whites next. If you’re using a stand mixer and have no secondary hand-mixer or extra stand mixer bowl, transfer the batter to another large bowl, set it aside, and thoroughly wash the empty stand mixer bowl. (Any residual butter in the bowl will prevent the egg whites from properly whipping.) Or you can do what I did and just whip the egg whites in a new bowl with my electric hand-mixer.
In a large, clean bowl, beat the remaining six egg whites on medium-low speed until foamy. Increase the speed to medium-high and gradually beat in the remaining 1/4 cup of granulated sugar. Continue to beat until the whites are stiff, but not dry. Using a large rubber spatula, fold about 1/3 of the egg whites into the reserved batter. Then gently fold the remaining egg whites into the batter. Avoid overmixing and deflating the batter - Fold only until the whites are incorporated. It will look sort of foamy like this:

Scrape the batter into the prepared pans.
Bake the cakes for 15-20 minutes (mine took more like 25-30, but you might want to check them earlier…). The cakes are done when the tops spring back when they are touched, and a toothpick inserted into the center of each cake comes out clean. (Note From First-Hand Experience: do not use a knife point…the toothpick makes a much smaller, less-noticable hole!)

While the cakes are baking, start the raspberry filling. (If you elect to skip the berry filling, the white frosting as written will likely yield enough to frost and fill the cakes, as long as you don’t go overboard in piling on the filling.)
Once the cakes are done baking, cool them in their pans on wire racks for 30 minutes. Invert the cakes onto the racks, peel off the paper, and cool completely.
Raspberry Filling
Makes enough to frost the tops of two 8” cake layers
2 tsp unflavored gelatin
6 Tbsp cold water
2 cups frozen raspberries
1/2 cup granulated sugar
2 egg whites (probably optional...)
1-1/2 cups heavy cream
In a small bowl, sprinkle the gelatin over 2 tablespoons of the water. Let it stand until the gelatin has softened, about 5 minutes.

Meanwhile, in a food processor, puree the raspberries with the remaining 4 tablespoons of water.

Use the back of a spoon to press the raspberry puree through a fine-mesh sieve. Collect the strained puree in a small saucepan – there should be about 1 1/2 cups. Add the sugar and stir over medium heat until the berry puree is warm and the sugar is dissolved.

Stir in the softened gelatin until it has dissolved. Let the mixture cool.
In a medium bowl, using an electric mixer, beat the egg white until firm peaks form. (By the way, this is the step I’d probably omit in the future…but I haven’t actually tried it myself, so I’m not quite sure how it’d turn out! Try it at your own risk...) Using a rubber spatula, fold the egg white into the cooled berry puree until no streaks of white remain.
In another medium bowl, beat the heavy cream until it holds soft peaks. Fold the whipped cream into the berry mixture and refrigerate until chilled, about 1 hour. Once the filling has chilled, it is ready to use.
While the berry puree and the cakes are cooling, you can make the fluffy white frosting.
Fluffy White Frosting
Makes enough to frost the exterior of a three-layer 8” cake (and then some)
5 large egg whites
1-3/4 cups granulated sugar
1/3 cup water
1/2 tsp cream of tartar
2 tsp vanilla extract
To make the fluffy white frosting, you’ll need to fashion a double boiler out of a pan of simmering water and a large mixing bowl. You’ll need to use an electric hand-mixer, so the stand mixer is out. Note that you’ll need to select an electric hand-mixer that is up to the task: you’ll need to use it for nearly 15 minutes straight. I burnt out the motor of my first hand-mixer while making this frosting, but the upside was that I had a great excuse to buy a great heavy-duty one which has successfully whipped the frosting on several occasions since then.
Fill a medium saucepan with several inches of water. Take a large, deep bowl and place it over the saucepan to see if the water touches the bottom of the bowl. It shouldn’t – and if it does, dump out some of the water. Turn the heat onto medium-high. You may need to adjust the heat as you work – you’re looking to maintain a simmer in the water, but not a boil, and again, the water level shouldn't touch the bottom of the bowl.

In the large bowl, combine the egg whites, sugar, water, and cream of tartar. With the handheld mixer, beat the mixture until foamy, about one minute.
With the bowl set in the saucepan of simmering water, beat constantly on medium speed until the mixture reaches 160 degrees. This will take approximately seven minutes. Use caution – don’t let the mixer cord melt or catch on fire or cause some other terrible situation!
Once the mixture has reached 160 degrees, remove the bowl from the heat. Add the vanilla and beat the frosting on high speed until it holds stiff peaks. This will take approximately seven more minutes. The frosting is now ready to use.

To prepare to assemble the cake, I start by placing two-inch wide strips of waxed paper on the edges of the serving plate. Place a cake round on the plate. Adjust the strips as necessary: the waxed paper should be placed in such a way that it catches any drips or smears of frosting, protecting the plate and keeping it clean while the cake is being frosted.
Top the bottom layer of the cake with half of the raspberry filling. Stack another layer of cake on top of the cake, then frost it with the remaining raspberry filling.

Finish by stacking the third layer on top. If necessary, insert skewers vertically into the stacked cake to help stabilize the layers (cut the skewers to the height of the cake). Using a large offset metal spatula, spread the fluffy white frosting around the sides and top of the cake, piling it up in dramatic swirls. Pull out the waxed paper strips and serve the cake immediately or refrigerate and bring it to room temperature before serving.

If you decide to add the egg to the raspberry filling, be mindful of its presence: the cake should be eaten shortly after the filling is prepared. I don’t think I’d eat it after the first day, but that’s just me. The fluffy white filling keeps slightly better, but not well enough to make the cake too far in advance. I’d recommend assembling the cake the same day you plan to eat it. (If you must do something in advance, bake the cake in advance and freeze the layers. Thaw them in their wrappers before you use them!)


