I have been struggling with how to write this post. I don’t like to sugarcoat my writing to give a false impression of glowing success in the kitchen, but nor do I want to be a total downer when something didn’t turn out quite right.
To be totally frank, I thought the recipes weren’t written very well. Definitely great ideas, but it’s obvious that the Food Network didn’t take enough time to test and rewrite either of these recipes. I was hoping I’d have time to test and retest to give you a better recipe, but with that backache problem I had earlier in the month, I just ran out of time. (I actually made the cookies before my back acted up, but once the back went out, that was it for the month. I barely got through the Daring Cook's challenge, and as you can see by the lack of other posts, I wasn’t able to make much of anything else either. Although my back has mostly healed by now, I’m late on this post because I’ve been out of town for a week.)
I’m not entirely ruling out “baker’s error” on my part...but I see that a number of other Daring Bakers had similar results, so I’m less likely to think the problems I identified were due to our Bakers’ own mistakes. I was also very cautious to follow the recipes exactly (especially once I identified several red flags). But, maybe they didn't turn out because of something I did - there were a number of other Daring Bakers who were happy with their results.
The Milan cookies were two thin cookies sandwiched together by a ganache filling, mimicking the appearance of the Pepperidge Farm Milano cookies. I was really excited to make these cookies, as the Pepperidge Farm version (specifically the mint flavor) are one of my favorite types of store-bought cookies. I love their crisp, buttery texture, and couldn’t wait to try them at home.
Unfortunately, the Food Network version didn’t taste anywhere close to the Pepperidge Farm version. Nor did they taste better (I don’t mind improving on something already delicious, but these cookies didn’t fit the bill). They were chewy and gummy regardless of their baking time (no, they weren’t underdone, I tried quite a few trays with a wide variety of baking times). The recipe called for an insane amount of lemon and vanilla extract (2 Tbsp each – that’s 1/4 cup total!), thus the dough reeked of cheap alcohol and didn’t taste any better. The baked, unassembled cookie reminded me more of a poorly-executed tuile cookie than the Milano cookies I’ve bought from the grocery store. The recipe’s suggested yield was inaccurate and the cookie size recommended in the original recipe was not authentic.
So, I am not including the recipe here because I don’t post things on this blog that I’m not reasonably confident about. (My rule of thumb is, if I wouldn’t serve it to houseguests, I’m not posting it on here. And if I can’t give a friend the link to the recipe and expect her to be able to recreate it herself, it’s not going on the blog.) You can click on over to the host’s blog or over to Food Network if you are dying to try the cookies out...
I will give you a photo – they looked good enough, they just didn’t taste good.
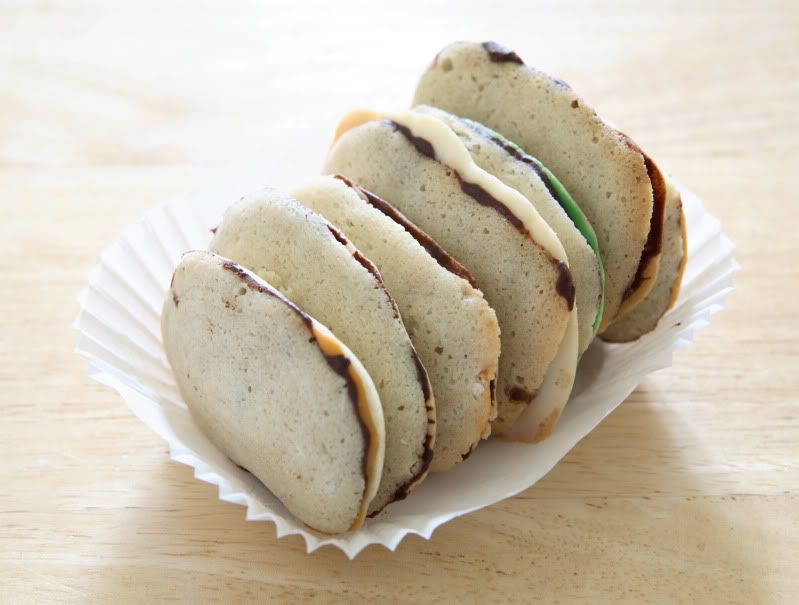
I did make multiple flavors of filling - shown from left to right are white chocolate/butterscotch, chocolate/orange zest, plain chocolate, chocolate/white chocolate, chocolate/mint, and a few duplicates: another straight chocolate, and another chocolate/butterscotch. The filling tasted good – it was simply basic chocolate ganache variations.
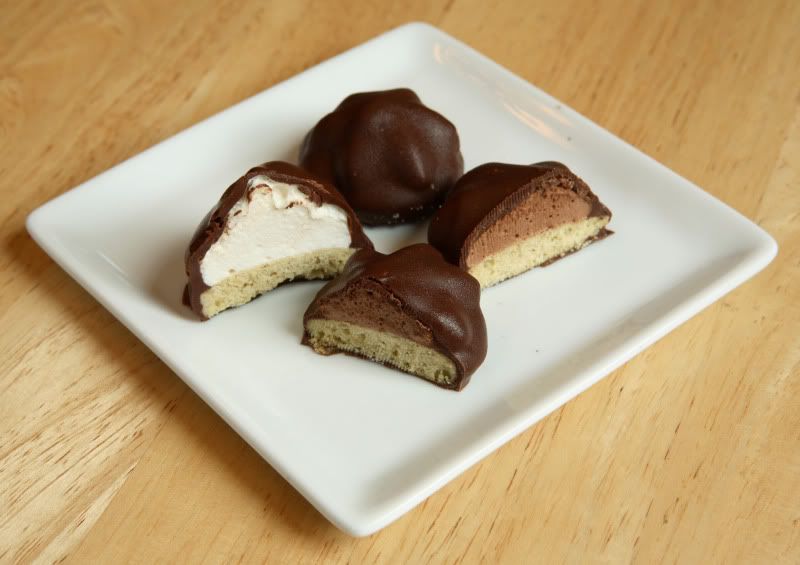
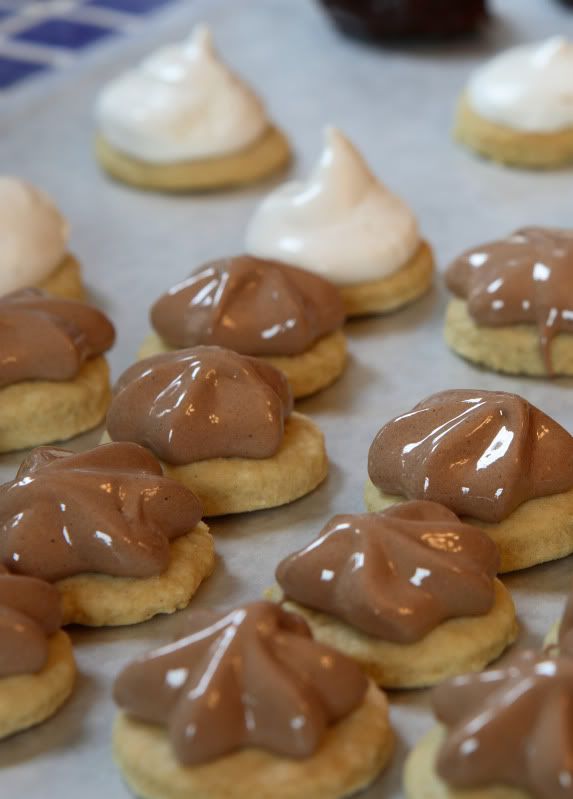
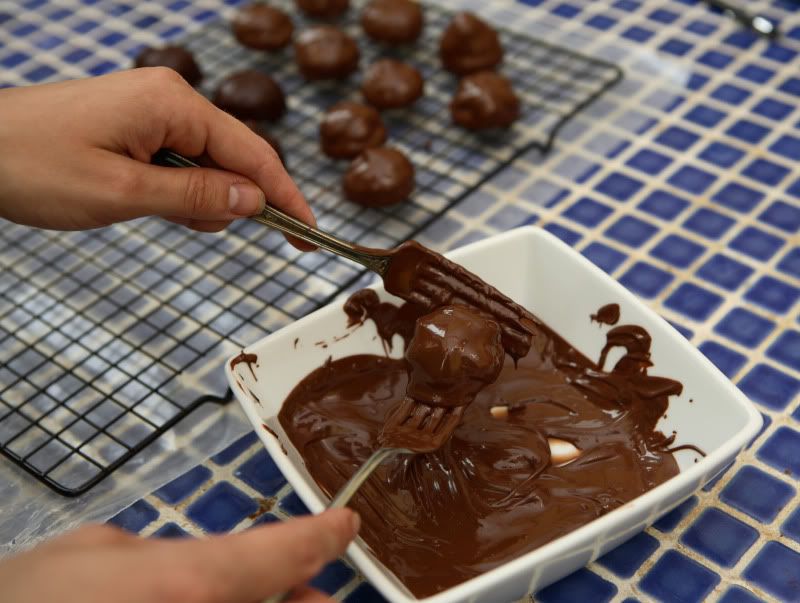
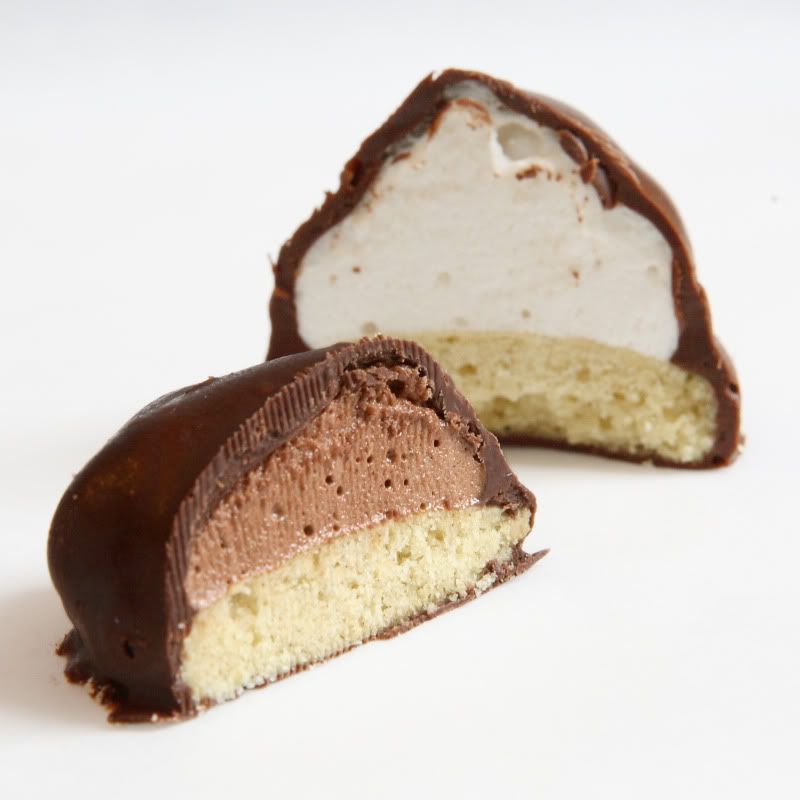
The marshmallow cookies were composed of three parts: a cookie base, which was topped with a homemade marshmallow “kiss,” all of which was dipped in a chocolate coating. My opinion of this recipe is varied: The “base” component of the cookie was dry and tasteless, and the recipe yielded twelve dozen cookies even though it indicated a yield of only two dozen. The marshmallow topping yielded enough to make four dozen cookies (that’s still twice as much as the suggested yield, but definitely not nearly enough to cover all of the cookies). And the chocolate coating yielded exactly the amount suggested in the original recipe: two dozen cookies. However, it was sticky and wet at room temperature, and bloomed as it sat to dry. Even after I popped the cookies in the refrigerator to set the chocolate up firm, the chocolate still did not have an appealing texture or appearance, and it melted once it was returned to room temperature. Tempering the chocolate would have solved these problems – and as I made a second batch of chocolate coating, that’s exactly what I did, with much better results.
Despite all the issues these cookie recipes presented, the marshmallow component was absolutely delicious, and it was a fun challenge - I’m glad I tried it, as I rarely make candy. I won’t give you the recipe for the entire completed cookie on this blog, but I will give you the marshmallow recipe, and you should make the marshmallow soon! Use it to top your favorite crispy sugar cookie recipe, or try a homemade graham cracker cookie, or a crunchy chocolate cookie, anything. Then dip it all in tempered chocolate, and you’ll have a delicious final product that’s similar to the intent of the original recipe. Or use the marshmallow to make homemade s’mores – toast them over your charcoal or gas grill if you don’t have plans to be near an open fire. You can pipe marshmallow “kisses” directly onto a piece of parchment paper dusted liberally with cornstarch.
I wouldn’t recommend that you double the marshmallow recipe because there’s a small window of time where it’s firm enough to not be overly runny, but soft enough to pipe into your desired shape. If you make too much marshmallow up at once, you won’t be able to pipe them all out before things set up and become too firm.
Another recommendation: I made my first batch of marshmallow with a stand mixer with the wire whip attachment. The second batch was made with a hand mixer with the standard beater attachment. Both worked well enough, but the best results were obtained with the stand mixer/wire whip setup - so if it’s available to you, use it!
Homemade Marshmallow
Makes enough to top four dozen 1.5” cookies
1/4 cup water
1/4 cup light corn syrup
3/4 cup (168.76 grams/5.95oz) sugar
1 tablespoon powdered gelatin
2 tablespoons cold water
2 egg whites, room temperature
1/4 teaspoon pure vanilla extract
3 Tbsp cocoa powder (optional)
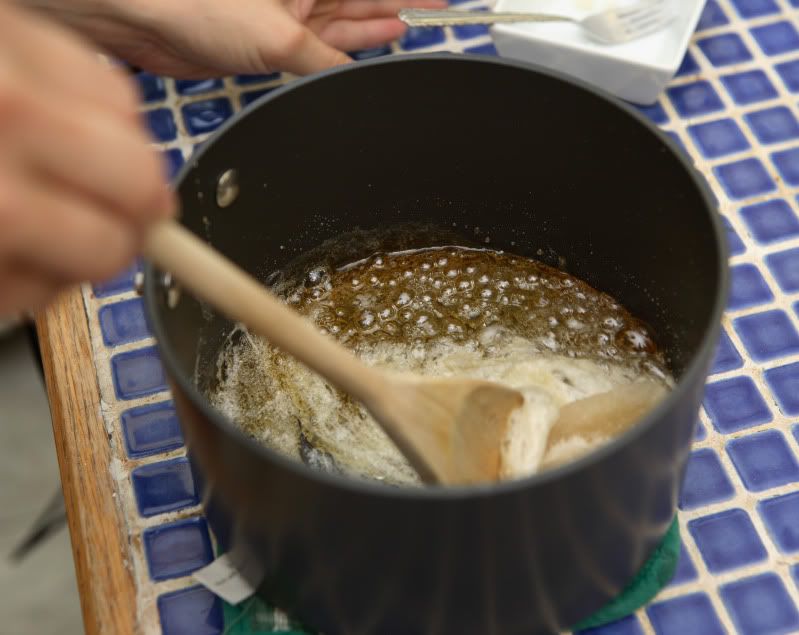
In a medium non-stick saucepan, combine the water, corn syrup and sugar. Bring it to a boil until it reaches the “soft-ball” stage, or 235 degrees on a candy thermometer.
Meanwhile, in a small bowl, sprinkle the gelatin over the cold water and let it dissolve. It will turn into a glob of gelatin – if there is still dry gelatin, give it a quick stir to ensure all of it has a chance to dissolve.
Once the syrup is at the “soft-ball” stage, remove the pan from the heat, add the gelatin, and mix. The pan will sizzle and bubble and glop up a bit, not too dissimilar from how it does when you make homemade caramel. Keep stirring and it will all smooth out. Note that in this picture, which was from my second batch of marshmallow, I ended up cooking the syrup a too long. (Sigh…distractions!) So it’s a little more golden than your results should be. It didn’t end up being a problem – the marshmallows still tasted great. And I was planning on making chocolate marshmallows for my second batch anyway, so the golden color didn’t matter once the cocoa was added.
In a large mixing bowl, whip the whites until soft peaks form. If in doubt, whip slightly more rather than slightly less – but don’t whip it so long that your whites are at a stiff-peak stage just yet.
With the mixer off, scrape the still-warm syrup into the whites.
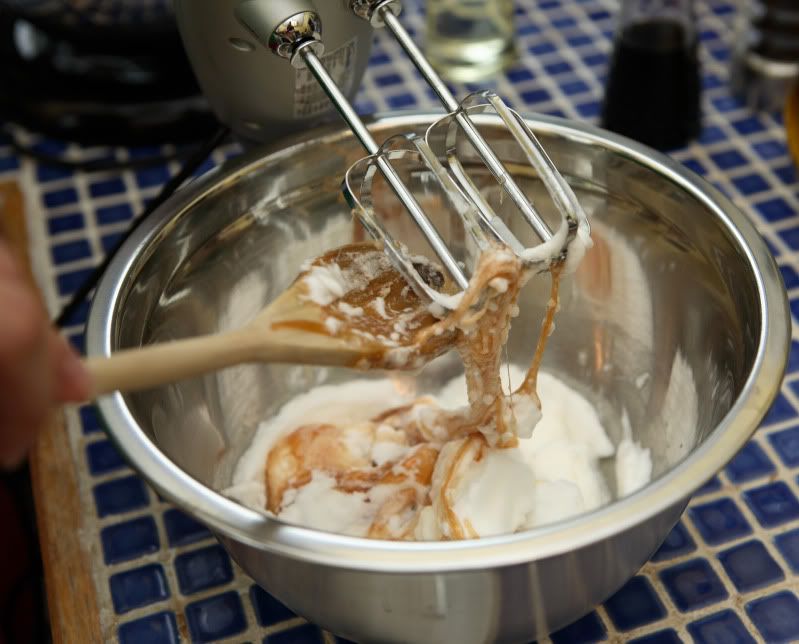
Add the vanilla. If you want to make chocolate marshmallows, flip the mixer back on high for a few seconds to begin to incorporate the liquid, then turn it back off and sift 3 Tbsp cocoa powder over the whites. Next, whether you’re making plain marshmallows or chocolate ones, continue to whip the marshmallow mixture on high speed until it is stiff.
Transfer the marshmallow mixture to a large pastry bag fitted with a wide tip – a large star Wilton #2110 (1M) makes a pretty shape. A large plain circle will work too. Don’t overfill the bag. I twist the top of the bag tightly closed and rest the pastry bag upside-down on itself in a tall liquid measuring cup so it won’t leak out of the top or bottom. Let the marshmallow mixture cool until it sets up enough to maintain an attractive shape during piping.
The marshmallow stuff sets up pretty quickly. Work fast because once it gets too firm you won’t be able to scrape it up or pipe it out nymore. But you can’t use it immediately – it does need to cool slightly or it will be too runny to hold shape. Pipe it onto cookies or graham crackers, or whatever your desired use is. Let the piped marshmallow dry until it is firm to the touch before you try to do anything else with it.
The syrup is difficult to clean up. Use dishwasher-safe implements and a non-stick pan. My non-stick pans won’t go in my dishwasher, so here’s how I clean them out: Fill the dirty pan about half-way with water. Put it on high heat and use a wooden spoon or other no-scratch utensil to scrape the sides and bottom of the pan as it heats up. As the pan gets warm, the sugar will dissolve into the water and rinse away. It might take a couple of tries to get the pan entirely sugar-free. The pan can then be washed by your usual method.
If you’re going to use a chocolate coating, I highly recommend that you take the time to temper the chocolate. It’s one of those things that sounds complicated, but is really super easy as long as you have a thermometer.
Tempered chocolate has a prettier appearance and won’t “bloom” (the lighter brown spotty swirls you sometimes see on chocolate). If you want some advice and background information on tempering chocolate, read Michael Chu’s article, Tempering Chocolate. I always use the Seed Method, which he describes at the point where the pictures begin. Remember, different types of chocolate temper at different temperatures, so be sure to adjust accordingly (broad suggestions on temperature ranges are included further down his article).
For what could potentially produce the best results, check out your chocolate manufacturer’s website, there’s a good chance they will list the exact temperature that should be used when tempering their brand of chocolate. In my case, since Scharffen Berger chocolate is what’s most readily available where I live, I have always referred to their website for tempering instructions when working with their brand of chocolate. However, they apparently changed their website recently – actually, it was three days ago, as of the time of this writing. Their new site doesn’t list tempering instructions, but their old site (which may or may not work by the time you read this) recommended the following instructions:
To temper chocolate, first chop up the chocolate you want to temper. Save a few chunks for later in the process. Then, melt all but the few chunks of chocolate over a double boiler to 110 degrees. By melting chocolate to 110 degrees F, you dissolve all crystals and start from scratch.
Take the chocolate off the heat. Add the chunks of chocolate you held back and, stirring, let it cool to about 80 degrees F.
Reheat the chocolate using a flash method over the hot water in the double boiler. Heat it 3 to 5 seconds at a time, take it off the heat, put it back on, rather than just sitting the bowl back on top of the hot water, until the mixture reaches 91 degrees F.
(During that last reheat step, I stir the chocolate five strokes while it's over the heat, then five strokes off the heat (then repeat). I think it's easiest when I get into that 1-2-3-4-5, 1-2-3-4-5 rhythm.)
I find it easiest to coat the cookies using two forks. I put the coated cookies on a wire rack to allow any excess coating to drip off, then transfer them to parchment or waxed paper until they can completely firm up.
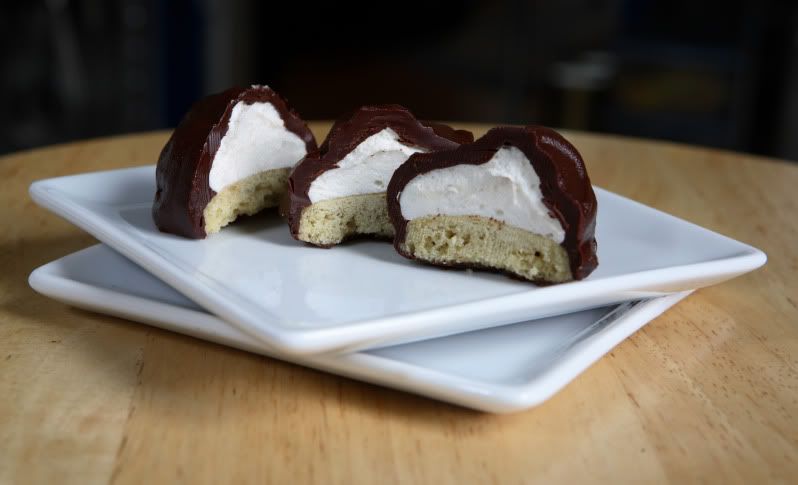
Although the cookies were dry tasting, they were cute!
The cookies below were made according to the original recipe, with untempered dark chocolate.
I shyed away from this challenge a.) because mint milanos are sheer perfection already and b.) because I seriously overdosed on the Little Debbie marshmallow treats in, like, 5th grade and can't eat them now. All in all, and given that I've already thrown two DB challenges on the floor, this was a wise decision.
ReplyDeleteYummm, I love all the flavor combinations you tried! Sorry the milanos didn't wow you, but they look good! And your mallows look so yummy!
ReplyDeleteBoth cookies looked great. I do agree that the biscuit was quite dry, but the mallows make it great. Great job on the challenge
ReplyDeleteI loved the Mallow cookies but I agree with your comments. I wasn't impressed with the cookie base at all, but the homemade marshmallows and chocolate coating saved it. The marshmallows were super easy and super delicious but did not make nearly enough for the amount of cookies. I ended up using the alternate store bought marshmallows, and that worked well. I had to keep the cookies refrigerated 24/7 to keep the chocolate from getting slimy. I've never tempered chocolate but I'll definitely try that if I make the cookies again.
ReplyDelete