Sunday, February 28, 2010

Butterscotch Pudding with Salted Whipped Cream


I’ve been on a butterscotch kick lately. It all started with the brown butter blondies I made awhile back – their butter-and-brown sugar flavor profile has had me thinking about butterscotch desserts ever since. A few weeks later, I made a butterscotch sauce to top some ice cream sundaes I served when we had family over to visit. Then I experimented with butterscotch pudding on Super Bowl Sunday, but felt the recipe wasn’t quite there yet, so it didn’t get blogged.

After I had a butterscotch sundae at Ted Drewes last night, I felt sufficiently inspired to try out another butterscotch pudding recipe. I found a different recipe from one of my favorite dessert cookbooks (one you’ve seen before), Diner Desserts, by Tish Boyle. Like every other recipe I’ve made out of that cookbook, it didn’t disappoint me.

Despite the inclusion of the word “scotch” in the name “butterscotch,” there actually isn’t supposed to be any scotch in traditionally-made butterscotch. (If you want, you can add a tablespoon of scotch and make less-traditional butterscotch pudding, but for the most authentic pudding, it should be left out.)

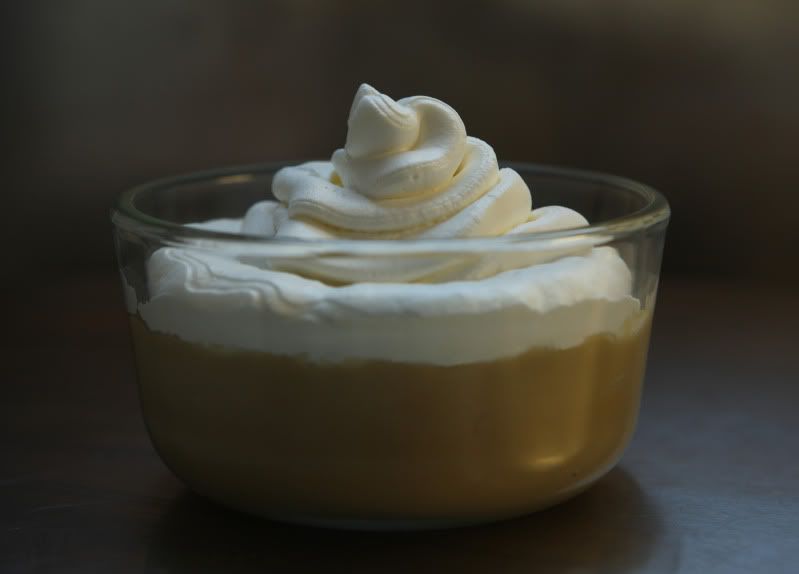
“Real” butterscotch flavor is created by butter and brown sugar. Therefore, any butterscotch-flavored dessert is necessarily going to be rather sweet. To counter all that sugar, the pudding tastes great with a little bit of extra salt. I suggest topping the pudding with salted whipped cream.  You could skip the whipped cream and sprinkle a pinch of sea salt directly on top of each of your puddings just before serving them.

When I’m making pudding, I like to set out all of my ingredients in advance. Making pudding isn’t too difficult, but it requires that you whisk the mixture almost constantly, so you can’t take time to set the whisk down and fuss over the next ingredient.

Butterscotch Pudding with Salted Whipped Cream
6 servings

Pudding ingredients:
3 large egg yolks
3 Tbsp unsalted butter, cut into tablespoons
2 tsp vanilla extract
1/3 cup cornstarch
1 cup packed dark brown sugar
1/2 tsp salt
2 cups whole milk
1 cup half-and-half
1 Tbsp scotch – optional (see above)

Salted Whipped Cream ingredients:
1/2 cup whipping cream
A generous pinch of kosher salt

First, make the pudding. It needs time to chill in your refrigerator prior to serving it, so start it at least three or four hours in advance.

I start by preparing my ingredients. Place the egg yolks in a medium bowl. Use a fork to whisk them together and set the bowl aside for later. You’ll need a one-cup scoop later, so set the scoop near the egg yolks so you’ll have it handy.

Measure out your butter. Go ahead and cut it into tablespoons. Set the butter aside. Keep your bottle of vanilla (and the scotch, if you’re going to use it) nearby because you’ll need to add it when you add the butter.

You’ll need six small dishes for your pudding. Locate them and set them nearby.


In a medium saucepan, off of the heat, stir together the cornstarch, sugar, and salt. The mixture should look very sandy.


Gradually whisk in the milk and the half-and-half. Bring the mixture to a boil over medium-high heat, whisking constantly. (As you’re whisking, the consistency will change from a liquid to a thick pudding.) Once the mixture begins to bubble, remove it from the heat.

Using the one-cup scoop you set aside earlier, ladle out approximately one cup of the milk/sugar mixture into the whisked egg yolks. Vigorously whisk the egg yolk mixture to combine everything, then transfer the egg yolk mixture back to the remaining milk/sugar mixture in the saucepan. Keep whisking everything until it is combined.

(If you don’t whisk constantly, your eggs can cook improperly and leave chunks in your pudding. If this should happen, don’t get too upset, you can pass the pudding through a sieve later. The pudding won’t have the exact same texture, but it’ll still be very edible. But try to keep whisking constantly to avoid the chunks!)

Return the pudding to medium heat - keep whisking - until the mixture comes back to a boil. Continue to boil, whisking constantly, for one minute. Immediately remove the pan from the heat and whisk in the butter pieces until they are completely melted. Whisk in the vanilla and the scotch, if you’re using it.  If you need to strain your pudding, do so now.

Pour the pudding into your serving dishes. Cover the dishes with plastic wrap, pressing the wrap directly onto the surface of the pudding, and refrigerate it for several hours, until it is well-chilled.

Just prior to serving the pudding, make the salted whipped cream:

Place the whipping cream and the salt in a medium bowl. Whip on high speed until soft peaks form. Spoon or pipe the whipped cream onto your pudding.


Wednesday, February 24, 2010

Lemon-Sage Cornish Game Hens with Porcini Tomato Sauce


There are several good reasons you should try this chicken recipe. For one, its pretty easy to make, considering it involves whole chickens. (When I first started learning to cook, whole birds seemed kind of intimidating to me…but the truth is, whole birds sound a whole lot more complicated than they actually are. And this particular recipe is fairly easy.)

The second reason you should make this recipe is that it tastes quite good. The chicken is baked at a high temperature, so the skin becomes nice and crispy while the chicken stays juicy and tasty. Lemons are stuffed in the chicken – they give a bright but subtle counterpoint to the umami flavor present in the mushroom tomato sauce.

This recipe is made with Cornish game hens (sometimes known as "rock" hens...they're basically just smaller-sized whole chickens). In my household, one large Cornish game hen will serve two people…but we’re used to moderately-sized portions. If you have big eaters, or if you want to have leftovers, you might want to allow one small hen per person.

Lemon-Sage Cornish Game Hens with Porcini Tomato Sauce
Serves up to 4

Chicken Ingredients:
Two to four 1-1/4 to 1-1/2 pound Cornish game hens (see the note above)
For each hen, you'll need...
1 medium lemon
2 large fresh sage sprigs (left whole), plus 1 Tbsp chopped fresh sage
1 Tbsp olive oil
salt and pepper

Sauce Ingredients (makes enough for four servings)
2 Tbsp olive oil
3/4 cup hot water
1/2 ounce dried porcini mushrooms
2 large cloves garlic, finely chopped
one 14.5-ounce can diced tomatoes, with juices

First, prepare the chicken:

Preheat the oven to 450 degrees Fahrenheit. You’ll need a roasting pan large enough to hold the birds.

Remove the giblets. (They’re usually contained in a little plastic baggie stuck inside the chicken cavity, but sometimes they’re just loose inside the bird.) They can be discarded or saved for another use. Rinse the chicken (inside and out). Pick off any stray feathers or any giant clumps of fat. Pat the chicken dry with paper towels.

Cut each lemon in half. Save half of each lemon (we’ll squeeze it on the meat later). Cut the remaining lemon halves into rough wedges. Stuff the lemon wedges and the two large sage sprigs inside the cavity of each bird. Put the stuffed birds in your roasting pan. I like to roast them breast-side-down, because the juices from the bird will help keep the meat moist and flavorful.

Drizzle one tablespoon of olive oil over each bird. Squeeze the juice from the remaining lemon halves over each bird. Sprinkle each bird with a generous pinch of salt and several generous turns of freshly-ground black pepper. Scatter 1 tablespoon of chopped sage over each bird.


Roast the birds at 450 degrees F until they are cooked through and the juices run clear when thickest part of thigh is pierced. (It should take approximately 45-50 minutes.) Transfer the birds to a platter (or a cutting surface if you want to cut them in half – use heavy-duty kitchen scissors to snip them in half); tent them with foil to keep them warm. Reserve the pan drippings.

While birds are roasting, start the sauce...and...

...I highly recommend that you serve this with creamy polenta…that's what the chicken is served with in the photo at the top of this post.  Follow your polenta package directions to make a creamy polenta. If you decide to make polenta, you’ll probably want to start it now, as it probably takes awhile to make…

Combine 3/4 cup of hot tap water and the porcini mushrooms in a small bowl. Let them stand until the mushrooms soften, about 30 minutes. Remove the mushrooms from the soaking liquid, reserving the soaking liquid. Roughly chop the mushrooms; set the mushrooms and the soaking liquid aside.

Heat 2 tablespoons of olive oil in a large saucepan over medium heat. Add 1 tablespoon of chopped fresh sage and the garlic; sauté them until they are fragrant, about one minute. Add the tomatoes, the chopped mushrooms, and the mushroom soaking liquid. Bring the sauce to a simmer – it can simmer on low heat until the birds are done roasting.

Once birds are done roasting, pour the pan drippings into a small measuring cup. Skim the fat off of the top, then stir the remaining drippings into the tomato mixture. Simmer the tomato mixture two minutes to blend the flavors. Serve the chicken with the sauce.

Monday, February 15, 2010

Chocolate Peanut Butter Cookies


I love reading the newspaper. There’s something satisfying about paging through the inky newsprint, sipping on a cup of hot cocoa, catching up on the latest national news, soaking up the details in the local stories, and comparing the weather forecast to reality. I always save the best for last: the comics (Calvin and Hobbes, I miss you!). The same section has the Sudoku puzzle…I love solving those. There’s a certain comforting feeling about tangible print media that cannot be recreated by online news sources.

My absolute favorite section is, of course, the food and cooking section (too bad it only comes once a week!). I love reading about local restaurants, getting ideas for recipes, and looking through the grocery advertisements. I’ve always been a recipe clipper – you’ll never know when you find a recipe that’s a keeper!

This recipe is one of those clipped-out-of-a-newspaper keepers. It was printed when I was ten years old (there are expired coupons for Chex cereal on the back of it!). My mom had this recipe clipping taped to the inside back cover of one of our favorite cookie cookbooks.

I remember wanting to make the cookies often as a child, partially because I have always loved the combination of chocolate and peanut butter, and partially because the cookies in the accompanying picture had these cute little green and white Christmas trees piped on them – they looked fun to eat. The name they gave the cookies was “Magic Peanut Butter Middles,” a name I always thought fell short (the “Magic” part seemed cool to a ten-year-old, but “Middles”?? Really??  Ok, I guess the name I came up with isn't much better...) Despite the writers’ (and my) halfhearted attempt at a creative title, the cookies were always a hit with me and my sister. Biting into what looks like just a plain old chocolate cookie and finding a delicious, creamy peanut butter filling is fun when you’re ten! (It’s still fun now!)

The recipe is very hands-on, so it’s a little messy, but the method is easy enough that my sister and I made them together when we were young.  You might enjoy making these with your kids.

Be sure you use “kid's” peanut butter, not the all-natural kind that you have to stir up before using. (The Jif/Skippy/Peter Pan/whatever kinds contain solid fats, and the cookie recipe presumably was written and tested with that fat composition in mind because it specifically recommends Skippy brand original creamy peanut butter.) Or, try the natural kind and report back on how it turns out…I have never tried using natural peanut butter in this particular recipe, but I have tried Jif brand original creamy peanut butter, and I can say that it works well.


Chocolate Peanut Butter Cookies
Makes 18 cookies

First, start the cookie dough:

Cookie Dough Ingredients
1-1/2 cups all-purpose flour
1/2 cup unsweetened cocoa
1/2 tsp baking soda
1/2 cup sugar
1/2 cup packed brown sugar
1/2 cup butter
1/4 cup “kid's” peanut butter (not the “natural” kind)
1 tsp vanilla
1 egg

Preheat your oven to 375 degrees F.

In a small bowl, whisk together the flour, cocoa, and baking soda - blend it well. Set it aside.

In a large bowl (I use my stand mixer, but always did this with a wooden spoon when I was a kid), beat together the sugar, brown sugar, butter, and 1/4 cup peanut butter until it is light and fluffy and well-combined. Add the vanilla and egg; beat well.

While the stand mixer is combining the above ingredients, I start mixing together the filling:

Filling Ingredients
1/2 cup “kid's” peanut butter (not the “natural” kind)
1/2 cup powdered sugar

In a medium bowl, combine the 1/2 cup peanut butter and the powdered sugar. It starts out with a rough texture…


…but will come together if you just keep stirring.


Roll the filling into 18 one-inch balls. (Yes, there’s more than 18 here…I made a bigger batch.) Set them aside.


(When I was a kid, I just used my hands, but now that I have better kitchen tools, I use a mini ice cream scoop like this one…


…so much easier! Less mess! It’s exactly one inch in diameter, so it’s the perfect size.)

Back to finishing the cookie dough:

Stir the cocoa mixture into the large bowl containing the creamed butter/sugar mixture until the ingredients are all blended together.

Now start shaping the cookies:

Take a heaping tablespoon-or-so of dough (about the size of a ping pong ball)…


…and use your fingertips to sort of flatten it into a little cupped circle of dough. Put one of the peanut butter balls in the center…


Shape the chocolate dough around the peanut butter to entirely encase it. Roll it around in your hands to make a smooth ball. Place the shaped dough about 2 inches apart on a cookie sheet (the original recipe calls for an ungreased sheet, but I always use parchment paper on my sheets for easier cleanup).


Use the bottom of a drinking glass dipped in granulated sugar to flatten the cookie balls to approximately 1/4-inch thick. (Don’t be too skimpy with the sugar or it’ll all disappear into the cookies as they’re baking.)


Bake at 375 degrees F for 7 to 9 minutes, or until the cookies are barely set and slightly cracked. They should still be soft – do not overbake them or they will be dry.


Leave the baked cookies on the warm cookie sheet for only a few minutes, just until they are firm enough to transfer to wire racks for cooling.

These cookies are soft inside, but have a nice exterior texture due to the sugar on top. With all the peanut butter in these cookies, you’ll definitely need to enjoy these with a tall glass of cold milk! Yum!