Sunday, January 31, 2010

Chicken Strips with Honey Mustard Dipping Sauce


It’s always more fun to eat food when you can dip it into a sauce or condiment. I guess that’s why hand-held, dip-able things like chicken nuggets are always on children’s menus at fast food restaurants. (If its fun to eat, kids will ask for it, right? Sales!)

Of course, they’re on the grown-up McMenu too, because you definitely don’t have to be a kid to enjoy using your hands to eat food. Since I do not usually include foods with the prefix “Mc” in my meal plan (but still like eating chicken strips), I just periodically make them at home.

Although my chicken strips are not quite as speedy as running through a drive-thru, they’re not too difficult to make and they taste much better. Plus, you know exactly what you’re putting into your homemade chicken strips. They’re much lower in sodium and they’re not deep fried, so they’re better for you.

Look for panko in the Asian foods aisle of your grocery store. If you cannot find it, you can substitute regular unseasoned bread crumbs, but you’ll have the best, crispiest texture with panko.

If you’re looking for something to serve at a Super Bowl party next weekend, give these chicken strips a try! The honey mustard sauce tastes good with other things, too – I accidentally discovered asparagus spears are delicious when dipped in the sauce.

First make the dipping sauce:

Honey Mustard Dipping Sauce
Makes about 3/4 cup

1/4 cup light mayonnaise
2 Tbsp honey
1/3 cup Dijon mustard
A pinch of kosher salt
1/4 tsp garlic hot sauce, or to taste

Mix all of the ingredients. Taste the sauce and adjust the spicy/sweet/tangy ingredients as necessary. Refrigerate the sauce until serving time.

Then make the chicken:

Homemade Chicken Strips
Serves 4 as an appetizer (add a few side dishes to serve it as an entrée)

2 chicken breast halves
1 cup all-purpose flour
A pinch of salt
A pinch of pepper
2 eggs
2 Tbsp water
Approximately 2 cups panko crumbs
Olive oil, for panfrying

Slice the chicken breasts in half horizontally into two flat, thin pieces.


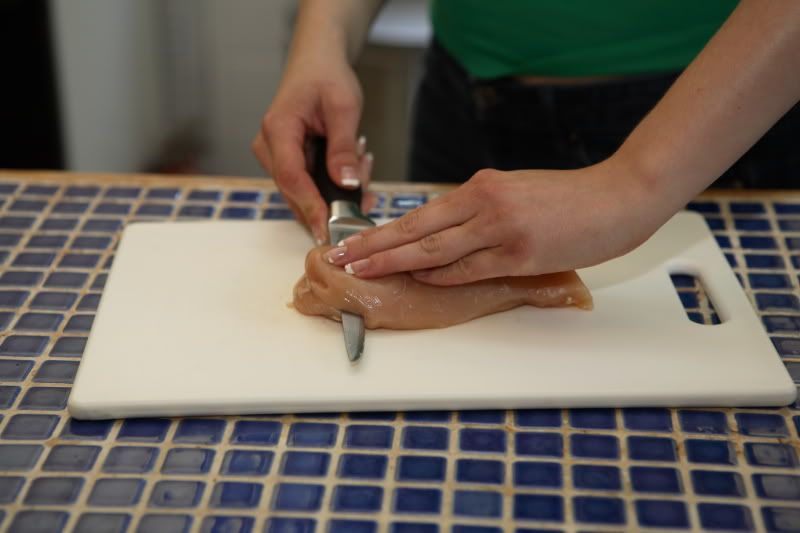
Then cut the chicken into “fingers.”

You will need three small bowls (cereal bowls, pie pans, small mixing bowls, whatever…all work well). In one bowl, place the flour, salt, and pepper. Stir it with a fork to combine the ingredients. In the second bowl, whisk together the eggs and water.

In the third bowl, place the panko. Since panko is kind of expensive, you might want to start with a smaller quantity and add more to the bowl only as you need it. I start with one cup and add a little more as I work, for a total usage of approximately two cups.

Bread the chicken:

When I bread meat, I usually use tongs. It is kind of messy. If you get flour and eggs on your hands, you’ll have a gluey mess that is difficult to wash off. Tongs are much easier to clean – if they get too gluey, just use a utensil to scrape the yuck off.

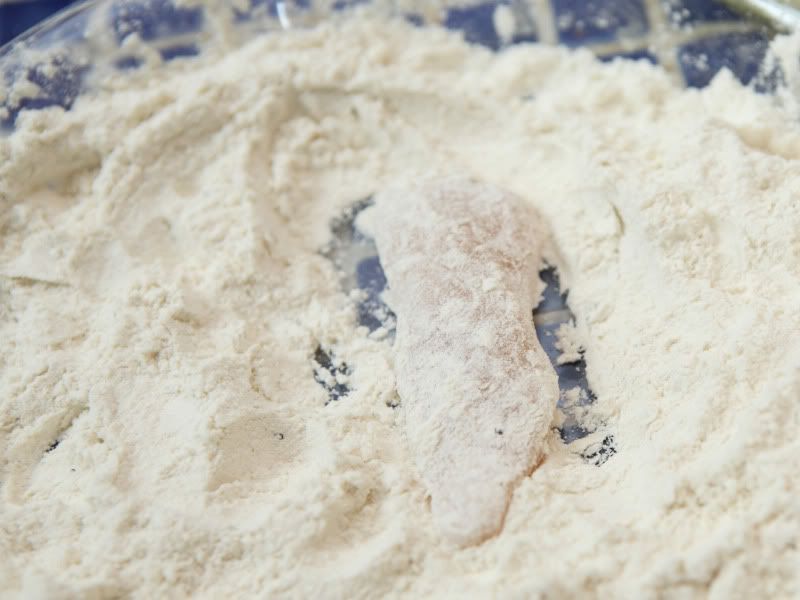
Each piece of chicken should be dipped first into the flour…


…then into the egg wash, and then into the panko.


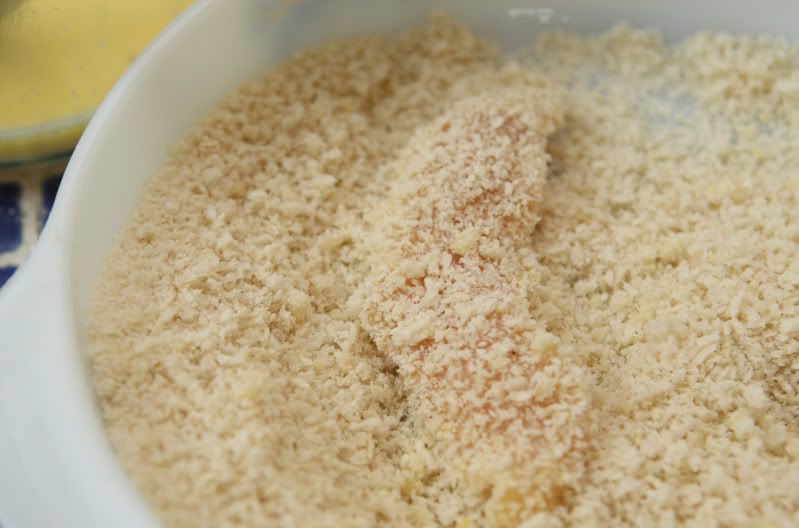
Be sure you have coated all parts of the chicken each time you dip – that’s especially important with the egg and the panko. Use the flat part of the tongs to pat the panko crumbs firmly onto the chicken pieces.

I transfer the breaded chicken to a rack set over a piece of waxed paper (to catch the crumbs) until its time to start cooking.


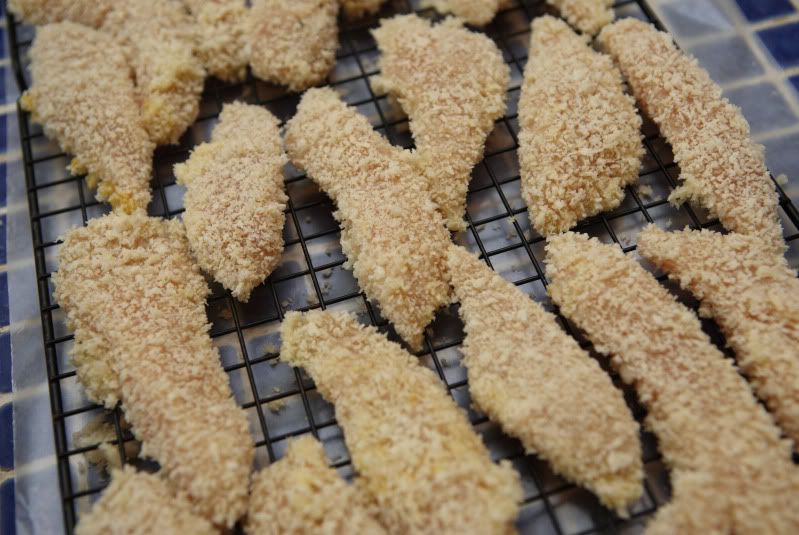
Once you’ve breaded a fair amount of chicken, you can start to cook it while you continue to bread the remaining meat.

To cook the chicken:

In a large nonstick skillet, heat a few teaspoons of olive oil over medium-high heat. Lay in several strips of chicken, enough to cover the bottom of the pan – but don’t let the chicken pieces touch each other. Cook the chicken for several minutes on each side until the breading is golden brown and the chicken is cooked through. Continue with the remaining chicken (you will probably need to add additional oil as you work). I drain my chicken pieces on paper towels after they’re cooked.

Serve the chicken with honey mustard sauce. Yum!

Saturday, January 30, 2010

Grilled Pork Tenderloin with Pineapple Ginger Sauce, served with Grilled Pineapple


Have you ever had grilled pineapple? If you haven't had it, try it!  It will totally change your opinion of pineapple. The heat causes the sugars to caramelize slightly, resulting in a deeper flavor, and the grill marks look pretty against the yellow fruit.

Not only does pineapple taste great grilled, but it also makes a great marinade ingredient due to a certain naturally-occurring enzyme. The recipe written here is a fruity pineapple marinade, spiked with ginger and a little garlic. It pairs really well with pork tenderloin, and works great on the grill.

If you’ve never bought or cut up a whole pineapple before, don’t worry, I have provided you with instructions! Give it a try!

How to choose a pineapple at the grocery store:

Pineapples don’t continue to ripen after they’ve been picked, so you’ll want to choose the ripest pineapple available from your grocer. Unless you live in or near Florida and have other locally-grown options available to you, you’re probably buying a pineapple imported from Hawaii. (I guess that statement is only true if you live in the United States…I’m not sure what the pineapple availability is elsewhere.)

Since Hawaiian pineapples are the ripest when they have a bright golden color, pick the pineapple that has the most gold on its skin (but not a mottled brown color, because too much brown = rotten!). Some green skin coloration is ok, but the greener the skin is, the less ripe the pineapple was when it was picked.

The spiky leaves should be stiff and green (again, not brown). Grab the base of the bunch of leaves – it should wiggle slightly…not too much wiggle, but not totally stiff either. One more thing to check: the pineapple was once attached to its plant on the underside of the fruit. Turn the fruit over and look to be sure the place where it was attached to the plant hasn’t turned moldy.

Now that you have your pineapple, you're ready to start making...

Grilled Pork Tenderloin with Pineapple Ginger Sauce, served with Grilled Pineapple
Serves 4

1 fresh pineapple
1/3 cup hoisin sauce
4 tsp peeled, grated fresh ginger
1 large clove of garlic, minced
1 tsp Dijon mustard
1-1/2 pounds pork tenderloin, trimmed of any fat
1 tsp soy sauce
2/3 cup chicken stock

First, cut up the pineapple:

Chop off and discard the leafy crown. A lot of people cut off the bottom of the pineapple at this point, but I usually leave it on because its roughness provides more stability on your cutting board (cut pineapple is slippery!). If its really uneven, though, you might prefer to cut it off. Cut off and discard all of the skin from the sides of the pineapple. If you missed any “eyes” or seeds, cut them out too.


If you haven’t yet, slice off and discard the bottom of the pineapple. With the pineapple standing on its end, cut straight down just next to the core.


Set aside the coreless piece. Mirror the exact same cut on the other side of the core so you have two large coreless pieces and one rectangular piece which still contains the core. Cut off the pineapple on either side of the core. The core is too tough for me to want to eat, so I usually just discard it (although I do know a guy who puts lots of salt on it and eats it anyway…).


You should be left with two smaller pieces of pineapple and two larger slabs of pineapple. Cut the larger slabs of pineapple into 1/2-inch slices. Set these aside – they’ll be grilled later.


The two smaller pieces of pineapple can be cut into chunks – place them in a small food processor. Process the pineapple to make chunky juice. Transfer approximately half of it to a small saucepan and reserve it for later – this will become a sauce to be served with the meat. The rest will be used to create a marinade.

Then, marinate your meat:

The remaining processed pineapple can be transferred to a gallon-sized food storage bag (or whatever vessel you’re going to use to marinate your meat). Add 3 Tbsp hoisin sauce, 2 tsp grated fresh ginger, the minced garlic, the mustard, and the trimmed pork tenderloin. Seal the bag and smash it around a bit to incorporate the ingredients and coat the pork. Let the pork sit a minimum of 15 minutes. (Obviously longer is fine, you can even put this together in the morning before you go to work.)

Then make the sauce:

Near the end of the marinating time, prepare the sauce: In the small saucepan with the reserved processed pineapple, combine 2 Tbsp hoisin sauce, 2 tsp grated fresh ginger, the soy sauce, and the chicken stock. Set the sauce aside until its time to grill the meat.

About grilling big pieces of meat:

When I’m grilling a piece of meat this big, I do several things. One is that I use medium indirect heat. I have a three-burner gas grill. I turn the two outer burners up to medium or medium-high, and the middle burner on low. The pork is placed over the middle low-heat burner.

I also use a heat-safe thermometer. They’re not too expensive to buy from the kitchen section of your grocery store. You just put it in the meat and leave it there during the entire cooking time. The thermometer beeps when it reaches the proper temperature. Easy, and totally worth the nominal cost. Go buy one while your meat’s marinating. (Just remember, use a hot pad to remove it when you’re done with it…it’s hot. Yes, that’s personal experience talking. Doh!)

Grill the pork tenderloin over medium indirect heat, with the grill covered, turning it once, until it reaches 155 degrees internally. The exact time varies (there’s a lot of variables), but count on around 20 minutes.


While the meat is grilling:

While the meat is cooking, bring the sauce to a simmer over medium heat, then turn it to low heat until serving time. The sauce will thicken as it bubbles – if necessary, add another splash of chicken stock if the pan gets too dry. I pour a few tablespoons of the sauce over the meat at the halfway point of the grilling time – just after turning it over. (Careful, don’t contaminate the sauce with raw meat…and if you do, bring it back up to a boil before serving it.)


Half-way through the pork's cooking time, add the reserved pineapple slices to the warmer part of the grill. Cook them over medium direct heat, turning them once, until the pineapple is soft and warm, with nice grill marks on each side. Each side should take just a few minutes at the most. When they’re done, you can move them to a cooler spot on the grill, or transfer them to a plate and cover them with foil to keep them warm.


When the meat has reached 155 degrees internally, remove it from the heat and cover it with aluminum foil. Let it rest for about five minutes before slicing it (the temperature will rise to 160 as it rests).

To serve, thinly slice the pork into medallions. Serve it alongside the grilled pineapple slices, topped with the sauce. I like to serve this meal with rice…it’s a great way to soak up the sauce!

Sunday, January 24, 2010

Sesame Noodle Salad

Last summer my blogger friend E. Lee of Bacon Concentrate blogged about a beautiful pasta salad.  Her salad was so pretty and colorful, it immediately caught my eye on her blog.  She was kind enough to allow me to use it in today's post.  The great thing about this salad is that you can customize the salad based on what you like to eat, or what is fresh and available at your grocery store. I followed her lead and used yellow bell peppers, carrots, and purple cabbage – the color combination looks great!

Usually when I make her pasta salad recipe, I plan to take it to work for lunch. One batch makes quite a bit (it uses an entire box of spaghetti), so I have more than enough to take to work for the entire week (with plenty to share with any interested coworkers!).


And although it’s the middle of winter where I live right now, I am looking forward to making this next summer to take along on a picnic or a camping trip. The salad is served cold so it’s easy to eat at a picnic, and there’s no mayonnaise in it, so it’s easy to store in your cooler without worrying about the mayo going bad.

E. Lee suggests – and I 100% agree – that you should be sure to use sesame oil in this dish. Do Not Substitute Another Type of Oil! If you have an Asian grocery store around, they should carry sesame oil. I have also seen it in the Asian foods aisle at my regular supermarket, but it’s a little more expensive there. My regular supermarket also has American sesame oil, which is sold in the same location as the olive oils. American sesame oil is lighter in color and is not quite as flavorful as Asian sesame oil. Because sesame oil has such a distinctive flavor, if you cannot find the Asian sesame oil, it would be better to use American sesame oil than to substitute another type of oil.

The same goes for the peanut oil used to stir-fry the components of the dish. It produces a great, distinctive flavor and has superb frying characteristics (it can be heated to a very hot temperature before it burns). Don’t substitute something else in its place.

Specialty oils keep in your refrigerator for a very long time. (Sometimes the oil will partially solidify if it is refrigerated: just let it sit out on your counter for 10 minutes before you use it…or if you forget to let it come to room temperature, use a clean chopstick to reach inside the bottle to give it a stir and loosen things up.)

Whenever I make any kind of pasta salad, I always lay my cooked pasta out to dry while I prepare the rest of the ingredients. The salad dressing will cling to the dried pasta better than it will cling to wet pasta, resulting in a better pasta salad. If you don’t have time, you can skip this step, but for best results, make time to let the pasta dry for at least a short while.


Sesame Noodle Salad
Serves 8

1 pound spaghetti pasta (use whole wheat for a healthier pasta salad)
2 green onions, green parts thinly sliced into matchsticks and white parts finely chopped (see the pictures below before you start cutting anything)
2 carrots, thinly sliced into matchsticks
1 yellow bell pepper, thinly sliced
About 1/4 of a head of purple cabbage, thinly sliced
4 ounces shitake mushrooms, thinly sliced
1/4 cup coarsely chopped cilantro
2 Tbsp finely chopped peeled fresh ginger
5 garlic cloves, finely chopped
A few Tablespoons of peanut oil, for stir frying
4 tsp sesame oil
2 Tbsp soy sauce
1 Tbsp rice vinegar
2 Tbsp brown sugar
1 tsp Asian hot sauce, more or less to taste
1/2 cup coarsely chopped roasted peanuts
Toasted sesame seeds (optional, for garnish)

First, start the pasta:

Break the length of the spaghetti in half. Cook the pasta according to package directions. Once the pasta has cooked, drain it thoroughly and spread it out to dry on a double-thickness of paper towels.


While the pasta is cooking, start chopping up the veggies:

Nearly every cut vegetable should be cut into a long skinny shape mimicking the size/length of the pasta. (If you elect to make this recipe with pasta that is smaller in size, like farfalle, cut the ingredients into shorter matchsticks to match the length of the pasta.)

Chop the green onions:  slice white and light green portions into rounds, and the hollow, dark green tops into matchsticks.  Keep the matchsticks separate from the rounds.


Cut the carrots, bell pepper, cabbage, mushrooms, and cilantro. Keep each ingredient separate from the others and set them all aside individually.


Finely chop the ginger and garlic; place them both in a large frying pan or wok. Add the white/light green portions of the green onions and about a teaspoon of peanut oil; stir-fry over medium-high heat until the ingredients are fragrant and the onions begin to soften. Transfer the ginger mixture to a small mixing bowl and set it aside. Reserve the pan for the next step.

Add the carrots to the empty pan; stir-fry over medium-high heat until they are crisp tender (as you work, you may need to add a little more peanut oil to the pan). Transfer them to a large mixing bowl. Repeat this process with the yellow bell pepper, then with the purple cabbage, then with the mushrooms, adding each cooked ingredients to the bowl with the carrots. Add the uncooked green portions of the green onions to the same bowl.

Finish the dressing:

In the small mixing bowl containing the ginger mixture, add the sesame oil, soy sauce, rice vinegar, brown sugar, and hot sauce; whisk with a fork to combine the ingredients

Put it all together:

Add about half of the pasta to the cooked vegetables. Drizzle about half of the dressing evenly over the pasta, then use a large spoon to stir the veggies into the pasta.


Add the rest of the pasta, the cilantro, and the peanuts. Drizzle the remaining dressing on top; continue to stir to incorporate all of the ingredients.

Garnish the pasta salad with the toasted sesame seeds. Serve the salad cold or at room temperature.

Thanks to E. Lee at Bacon Concentrate for the recipe inspiration!

Monday, January 11, 2010

Big Batch Tomato Sauce


One food I’m kind of picky about is tomato sauce. I usually am disappointed in restaurant tomato sauces – they’re usually too sugary, or they have that overstewed-tomato flavor. I prefer a tomato sauce that is fragrant with onions, sweetened primarily by fresh vegetables, and minimally cooked to have the freshest flavor possible.

I like to make my tomato sauce in fairly large quantities. I divide the sauce up and freeze it in small portions so I have it ready when I make a recipe that requires it – no canned or jarred store-bought sauces needed. This recipe will make approximately six cups. You could double the recipe if you really want to make a large batch of sauce.

The sauce will need to be pureed. You can accomplish this in a food processor or blender, or you can use what I think works the best: an immersible stick blender. I’m so bad about hand washing a regular blender (all those parts!) and my food processor isn’t entirely liquid-tight (ouch – hot tomatoes!), so I just drop the stick blender into the sauce and give it all a whirl.

This sauce can be used in many things – baked pastas like lasagna or manicotti, served with veal or chicken parmesan, or used to top spaghetti. It can serve as the starting point for several types of flavor profiles. Spicy sausage or shredded basil could be added. A few tablespoons of cream and some parmesan cheese could be used to enrich the sauce. Roasted garlic could be stirred in. The sauce is intentionally left simple and unembellished so you can flavor a few cups of the sauce at a time without committing all six cups to the same flavor profile.

The best thing about this sauce is that it’s quite simple to make. I usually make the sauce with good-quality canned diced tomatoes because the quality of store-bought tomatoes is usually too unpredictable. Do not use canned crushed tomatoes because they tend to be too pasty in texture. If you happen to be making this sauce during prime tomato season, by all means, use fresh tomatoes (peeled, seeded, and roughly chopped).

Big Batch Tomato Sauce
Makes approximately 6 cups of sauce

2 cups chopped yellow onions (one Very Giant Onion yielded two cups for me – but your mileage may vary because like I said, it was GIANT)
2 Tbsp olive oil
2 cups chopped carrots (cut them into 1/4-inch thick slices; this was about six medium-sized carrots for me)
1 cup chopped celery (cut it into 1/4-inch thick slices; this was about four stalks of celery for me)
Three 14.5-ounce cans diced tomatoes (and their juices - do not drain! This works out to be approximately 5 cups of tomatoes.)
1 tsp coarse kosher salt
1 Tbsp sugar

Begin by chopping your onions. Place them in a stockpot (mine is 8 quarts). Add the olive oil and cook over medium-high heat until the onions begin to brown – stir them periodically.

While the onions are cooking, chop your carrots and celery. Set them aside until the onions have browned.

Once the onions have begun to brown, stir in the carrots and celery. Reduce the heat to medium and add the tomatoes, salt, and sugar. (Do not confuse the salt and sugar measurements or you’ll be sorry…)


Simmer the tomato mixture, uncovered, over medium heat until the carrots are tender, approximately 20 minutes. Stir the sauce periodically; taste it and adjust the salt/sugar as appropriate.

Once the carrots are tender, puree the sauce. As I mentioned above, I like to use a stick blender, but you could also puree it in a regular blender or in batches in a food processor.

The sauce is ready to use or freeze. I divide my sauce between two-cup (or smaller) containers. Once the sauce has cooled to room temperature, the containers go in the freezer. After the sauce has frozen, I run the sealed container under warm water for a few minutes so I can pop out the “ice cube” of frozen sauce. The sauce cubes go into a large freezer bag for long-term storage.

Tortellini in Cream Sauce


One of St. Louis’ great neighborhoods is called The Hill – it’s kind of a little Italy. Nestled between the cute little homes are lots of Italian restaurants, several great Italian grocery stores, bakeries, and even an Italian deli. One of St. Louis’ favorite restaurants, Cunetto House of Pasta, is on The Hill.  Amongst many other delicious entrees, they have an outstanding tortellini and cream sauce dish: tortellini, mushrooms, peas, and prosciutto enveloped in a velvety cream, butter, and parmesan sauce. It is quite good. If I lived closer, I’d eat supper there all the time.

Since it is at least a 45 minute drive to get to The Hill, I have my own version of tortellini and cream sauce that I can make at home. It is surprisingly quick and easy – so easy it can easily be made on a weeknight. My version isn’t an exact copy of their dish, but it tastes good enough that the difference doesn’t matter to me. It is not exactly health food, but it is One Good Cream Sauce, worth ignoring the calories and eating it every once in awhile.  To help with portion control, the recipe I’ve posted here makes enough for a smallish main dish.

There are several keys to success with this recipe: One – have everything ready to go before you start to make the sauce. (You can prepare everything while your pasta water is coming to a boil.) You don’t want to be scrambling to grate cheese while your butter overheats. Two – don’t omit the nutmeg – its just a pinch – and please use freshly grated nutmeg!  Three – when you select your cheese, please don't use the powdery stuff in the green container.  This is a dish where real Parmigiano Reggiano makes a difference.

Tortellini in Cream Sauce
Serves 4 as a smallish main course

1 cup freshly grated Parmigiano Reggiano cheese (I use the medium sized holes on my box grater)
2 ounces prosciutto
3 Tbsp unsalted butter
1-1/4 cups heavy cream (unwhipped heavy whipping cream, not coffee creamer)
freshly grated nutmeg
freshly ground black pepper
4 cups frozen packaged fully-cooked tortellini
1-1/2 cups frozen peas


Fill a large saucepan or small stockpot with water, bring it to a boil. (This will be your pasta water.) While the water is coming to a boil, prep the rest of your ingredients:

Grate the Parmigiano Reggiano cheese, set it aside. Finely chop the prosciutto, set it aside. Locate your butter, measure the cream, and get the nutmeg and pepper out so you’re ready to go.


Once your pasta water is boiling, stir in the frozen tortellini. Watch the pot closely; as soon as the tortellini begin to boil (and it wont take long – just a couple of minutes), add the frozen peas.

Again, watch the pot closely; as soon as the pasta mixture begins to boil, remove it from the heat, drain it, and set it aside.

Add the butter to the empty pot – melt it over medium heat. Add the nutmeg and the black pepper; stir the butter mixture a few times until the spices have heated and are aromatic. Stir in the prosciutto; heat it through. Stir in the cream and heat it through, stirring constantly. Add the grated cheese, then return the cooked pasta to the pot. Gently stir the pasta to melt the cheese and coat the pasta evenly. Serve hot. The longer the sauce sits, the thicker the sauce will get.


A note for vegetarians: The sauce is nearly vegetarian – except the prosciutto. If you omit the meat, you might want to add a little bit of salt to the sauce. (The prosciutto is very salty; you’ll need to make up for its absence.)

A note for those who don’t want to use cream: You can cut back on the fat slightly by substituting half-and-half for the heavy cream. The sauce won’t be quite as thick and will not taste quite as good, but you might feel its worth the reduction in calories and fat.

Thursday, January 7, 2010

White Chocolate Cherry Oatmeal Cookies, with Simple Hot Cocoa


Today was a snow day for me. It doesn’t snow too often in St. Louis – usually just a few times each winter. So when we have four inches of accumulation, most schools and many businesses go ahead and call off. I was given the day off! Great! Besides, it was really one of those days where you might as well just stay indoors curled up in a blanket, sip on a hot chocolate, and enjoy a good book…and I had off from work and didn’t have to go anywhere, so that’s exactly what I did.

I knew I wanted to bake something today. With the beautiful – but cold – blanket of sparkly white snow just outside my kitchen window, I wanted to make something that would heat my kitchen up and ward off the chill. I also didn’t want to have to go to the store to collect ingredients – it was just too cold outside! Fortunately, I had all the ingredients at home for oatmeal cookies…

And, I’ve been craving oatmeal cookies lately. My version is a soft and moist cookie, spiced with a bit of cinnamon and nutmeg. They are studded with sweet Lambert dried cherries, compliments of my mom’s summer cherry harvest (thanks, Mom!). White chocolate chips are folded into the dough – they give a creamy flavor counterpoint to the sweet cherries.

White Chocolate Cherry Oatmeal Cookies
Makes about 3 dozen cookies

1-3/4 cups flour
3/4 tsp baking soda
3/4 tsp baking powder
1/2 tsp salt
1/2 tsp ground cinnamon
1/2 tsp ground nutmeg
1/2 lb (2 sticks) unsalted butter, room temperature
1-3/4 cups dark brown sugar
2 large eggs
2-1/2 tsp vanilla
1 c dried cherries, either sweet or tart will work, but I used sweet, because that is what I had on hand
3-1/2 cups oatmeal (not instant!)
1 c white chocolate chips

Preheat your oven to 350 degrees. Cover your cookie sheets with parchment paper.

In a medium bowl, use a whisk or a fork to mix together the flour, baking soda, baking powder, salt, cinnamon, and nutmeg. Set this aside. (I tend to measure my nutmeg and cinnamon generously, like the next picture…)


Place the butter and brown sugar in a clean large bowl, preferably one that goes to a stand mixer. Beat the butter and brown sugar together until it is well-incorporated. Add the eggs and vanilla, and beat until a smooth batter has formed.

While the batter is beating, roughly chop the cherries to approximately the size of a raisin. Set them aside.


Once the butter mixture is smooth and well-mixed, add the flour mixture, stirring only until the ingredients are combined.

Add the oatmeal, cherries, and white chocolate chips. Stir until all ingredients are incorporated. (The batter is very stiff – this is definitely a recipe that is easier to make in a stand mixer.)


Use a small ice cream scoop to portion out 1.5-ounce balls of dough, approximately the sized of a ping pong ball. Place the cookie dough balls about two inches apart on a cookie sheet covered with a sheet of parchment paper or a Silpat.


Bake at 350 degrees until the cookies are pillowy and are almost firm to the touch, 6 to 9 minutes. They should appear slightly underbaked. Remove the cookies from the oven and let them sit on their cookie sheet, undisturbed, for five minutes. Transfer the parchment paper to a cooling rack and let the cookies sit on the paper until they are firm enough to transfer directly to the cooling rack.

What goes better with cookies on a cold winter day than…hot cocoa! Its super easy to make and tastes so much better than the stuff that comes from a packet. I don’t own a microwave, so I just make mine on the stovetop, but if your kitchen is so equipped, you could zap your milk long enough to heat it just until its steaming hot.

I have several small mixing bowls, so I mix each drink’s cocoa individually, that way I don’t have to worry about evenly portioning the cocoa mixture. I just use a fork to stir up each bowl of cocoa.


Simple Hot Cocoa
For each drink, you’ll need:

1 cup of milk
1 Tbsp granulated sugar
1-1/2 Tbsp cocoa powder
A teeny, tiny pinch of salt

Scald the milk over medium heat. (That is, heat it over medium heat, but don’t let it boil. It should be steamy and warm, but not bubbling.)

While the milk is heating, in a small bowl, combine the granulated sugar, cocoa powder, nutmeg, and salt. Whisk it together with a fork until it is well-incorporated and all of the large cocoa chunks have been disintegrated into powder. Pour the cocoa mixture into the bottom of your mug; top with the warm milk and stir to incorporate.


If you’re feeling particularly decadent, top your hot chocolate with whipped cream and a drizzle of homemade caramel sauce.